


Managing your own CA is the best solution, but usually involves arcane commands, specialized knowledge and manual steps.
mkcert
SSL for services not exposed to the internet might seem like witchcraft, but even you can set up a local CA in no time! Here’s how
TL;DR
General usage
apt -y install mkcert
mkcert --install
mkcert yourdomain.com "*.subdomainwildcards.com" 192.168.1.3 ::1 localhost
mkcert -CAROOT # Copy the rootCA.pem file from there for later, generally in /root/.local/share/mkcert
The certificate files are in the directory you ran the command in, go nuts!
Trusting on other systems
- Get the rootCA.pem file from earlier
- Install mkcert on another system
- Put the file in the directory from
mkcert -CAROOT- Generally in
/root/.local/share/mkcert
- Generally in
mkcert --install
mkcert
mkcert makes it so easy that once you have it, you only need two commands!
To use it you’ll first need to download mkcert or install it from your package manager, though I’d recommend downloading the pre-built binary.
Downloads:
For a package manager you know what to do
apt -y install mkcert
#or
yum -y install mkcert
#or
dnf -y install mkcert
For debian you might need to use the backports repo if you use bullseye at least.
Installing the Certificate Authority(CA)
Keep in mind that for everything below you need to be the root user. You can also prepend sudo to every command, but keeping your admin and normal accounts separated is ideal.
Once you have mkcert, assuming you are the root user and you are in the directory where mkcert was downloaded and the file is named mkcert, run the following command to get the CA installed
chmod +x ./mkcert
./mkcert --install./mkcert -CAROOT
The last command will show you the location of the CA files in case you need to use the certificates elsewhere. This is usually in /root/.local/share/mkcert called rootCA.pem. You don’t need the key unless you want to create certificates on other systems
Installing on other systems
It’s as easy as placing rootCA.pem in /root/.local/share/mkcert on another system and running ./mkcert --install again.
If you don’t want to, or can’t use mkcert on the other system you need to upload the certificate to that system, then:
Rhel7
mkdir -p '/etc/pki/ca-trust/source/anchors'
mv 'rootCA.pem' '/etc/pki/ca-trust/source/anchors/rootCA.pem'
update-ca-trust
Debian
mkdir -p '/usr/local/share/ca-certificates'
# The certificate needs to have the ".crt" extensions for this
mv 'rootCA.pem' '/usr/local/share/ca-certificates/rootCA.crt'
update-ca-certificates
Home Assistant (HA)
HA runs on a form of Debian, so you need to do the same thing. This is also true for the Container versions(LSIO included), but you need to make sure to mount the files properly inside. See below
Container persistence
Container persistence
If you use HA in a container, you will realize that every time you recreate the container to update or change some docker options/environment variables, the CA disappears.
You can solve this easily by mounting the CA, however you still need to run update-ca-certificates.
volumes:
- /path/to/rootCA.pem:/usr/local/share/ca-certificates/rootCA.crt- There’s an integration you can use for this
- If you use linuxserver’s version, you can have a simple custom script that runs at startup
update-ca-certificatesvolumes:
- /path/to/trust-ca.sh:/custom-cont-init.d/script.sh:ro- You can set up a shell command in home assistant itself, though I did not test to see if integrations can properly startup with this method
shell_command:
  update_certificates: update-ca-certificates
Creating a certificate
Home Assistant
Now that we’re done with the setup, we’ll create a certificate! Let’s say you are running Home Assistant on homeassistant.local:8123 and 192.168.1.10:8123 and want HTTPS
mkcert homeassistant.local 192.168.1.10
# Now if you ls you'll find your certificate and its key
ls
# homeassistant.local+1.pem
# homeassistant.local+1-key.pem
If you want you can rename them to something else, maybe ha.pem and ha-key.pem, the name doesn’t really matter.
mv homeassistant.local+1.pem ha.pem
mv homeassistant.local+1-key.pem ha-key.pem
Upload them to your home assistant in any directory you want, maybe in /ssl or /config/ssl, then edit your configuration.yaml and add:
http:
  ssl_certificate: /ssl/ha.pem
  ssl_key: /ssl/ha-key.pem
That’s it!
Using it in Nginx Proxy Manager
Access your frontend, you should know how to do this, then head over to SSL Certificates, and add a new Custom certificate
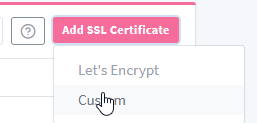
Add your certificate and certificate key, and you’re ready to use it!
Using it with python’s certifi
You already know how to use it by modifying the code, but to do it without modifying the code you can run this neat command
cat /path/to/the/rootCA.pem >> `python -m certifi`
Leave a Reply